 |
Written by Curtis L. Olson
curt@infoplane.com
with many contributions from others.
Copyright © 1994 - 1997 by Curtis L. Olson.
This program is free software; you can redistribute it and/or modify it under the terms of the GNU General Public License as published by the Free Software Foundation; either version 2 of the License, or (at your option) any later version.
This program is distributed in the hope that it will be useful, but WITHOUT ANY WARRANTY; without even the implied warranty of MERCHANTABILITY or FITNESS FOR A PARTICULAR PURPOSE. See the GNU General Public License for more details.
You should have received a copy of the GNU General Public License along with this program; if not, write to the Free Software Foundation, Inc., 675 Mass Ave, Cambridge, MA 02139, USA.
CBB is a personal finance management utility for Unix/X11. It is written entirely in Perl and Tcl/Tk so it is very portable and very extendable. It is a program for anyone who would like to balance their checkbook and manage their money using free software under Unix and X11.
CBB is intended to be an open, extensible program. It utilizes a simple, tab-delimited data file format and, because it is written entirely in Perl and Tcl/Tk, it is very modifiable. In addition, it provides a simple interface for users to add their own reports, graphs, and external modules without modifying any of the CBB source.
The name, CBB, stands for the Check Book Balancer. It is intended to fit well in the Unix naming scheme where commands should be short and easy to type. Every once in a while I try to think of something a little more creating, but as of yet, nothing has come to mind.
CBB has now existed for more than two and a half years. Version 0.60 represented a fairly substantial reworking/reorganization of version 0.53--although this may not always be immediately visible on the surface. Version 0.62 represented a substantial amount of rework to better support tk4.0. Now, versions 0.70 and later look much spiffier and sport completely reworked internals, plus many new features, tweaks, and fixes.
I sincerely hope you can find CBB useful in your day to day and year to year money management. I am always working to improve this program so please send in your comments, suggestions, and complaints.
If you would like to contact me, you may send email to curt@infoplane.com. Although sometimes the business of life gets the best of me, I will do my best to respond in a timely manner and address your issue or concern.
The address for the CBB mailing list is cbbers@infoplane.com. To subscribe, send a message to cbbers-request@infoplane.com with a message body of subscribe. To unsubscribe, send a message to cbbers-request@infoplane.com with a message body of unsubscribe. Recent messages to this list are archived at:
http://www.menet.umn.edu/~curt/cbb/mail.archive/
The current version of CBB is always available via anonymous ftp from one of the following sites:
    ftp://ftp.me.umn.edu/pub/finance/cbb-latest.tar.gz
    ftp://ftp.fifi.org/pub/cbb/cbb-latest.tar.gz
CBB is written in Perl and Tcl/Tk. These need to be installed on your
system before you can can continue. Note, CBB now requires tk4.0 or
higher and perl5.002 or higher. If you notice any problems or
incompatibilities please let me know.
Tcl and Tk are available via anonymous ftp from:
ftp://ftp.smli.com/pub/tcl/
Note, the Tcl FAQ has a list of mirror sites. You can read the FAQ online at:
http://www.cis.ohio-state.edu/hypertext/faq/usenet/tcl-faq/top.html
Perl is available via anonymous ftp from:
    prep.ai.mit.edu:/pub/gnu/perl-5.***.tar.gz
    ftp.cs.umn.edu:/pub/gnu/perl-5.***.tar.gz
For most systems and environments, installing CBB will be very straightforward. Simply follow the instructions in section 2.5.1.
Gunzip and untar the distribution file and cd to the newly created directory and run:
make install
Specify the location of perl5 and wish4.x and specify where you would like the executables and associated files installed.
Periodically, new version of CBB are released. Most of the general laws of computer upgrades apply to CBB. Although I go to great efforts to ensure new versions work better than the previous version, occasionally problems creep in. Use a good measure of caution (such as backing up your data files, and keeping a copy of the previous version of CBB) when upgrading this or any other component of your system.
Once you have CBB installed and running, and if you are ``net'' connected, upgrading to the latest version is trivial. Just follow the simple instructions in section 5.1.
You can manually upgrade CBB by simply installing the new version over the top of the old. Be aware that I occassionally add, remove, or change the names of files in the distribution. Over time, old, outdated, useless files could accumulate in the CBB lib directory.
The environments and needs of users are often widely varied. The CBB install script supports several additional options. If you are having trouble installing CBB, you may want to read through this section for ideas.
If the copy of perl that comes first in your path is an older version (such as perl4) and you have perl5 located someplace else on your system, you can use the following command to install CBB:
make PERL=/path/to/newer/copy/of/perl install
The CBB install script by default is interactive and askes several questions. Running make install simply runs the install script, and nothing else. If you run the install script by hand, ./install.pl you can pass it several command line options. The following options are available:
    --help:             Display the usage message.
    --perlpath <path>:  Full pathname to perl interpreter.
    --wishpath <path>:  Full pathname to wish interpreter.
    --bindir <dir>:     Directory to install executables.
    --libdir <dir>:     Directory to install support files.
If you specify any one of the above paths from the command line, the install script will not prompt for it.
The CBB install script has two addtional options to assist package maintainers. Most Unix operating systems have a ``package'' format for installing packages. Packages are convenient because they can be quickly and easily installed, upgraded, and deinstalled. The software come preconfigured in the package. Unfortunately most versions of Unix have their own incompatible package format.
However, if you are a package maintainer for some brand of Unix, the following options will interest you:
    --prefix <dir>:   Root directory where CBB will eventually be
                      installed and run from ... this is where CBB
                      thinks it lives.
    --destdir <dir>:  Root directory where CBB will actually be
                      installed right now for package building
                      purposes.  It is assumed that once the package
                      is installed, CBB will reside in the --prefix
                      directory.
These options allow you to install CBB in a one directory, but modify the internal variables and pointers to make CBB think it has been installed in a completely different directory tree.
If you are upgrading from a pre-0.60 version, you will need to upgrade your data files as well.
If you are not upgrading from a pre 0.60 version, you can safely skip this section. This section describes the procedure to migrate your data files from the pre-0.60 format to the current format.
The initial versions of CBB saved its data in an ASCII text file with the fields delimited by the `:' character. However, not too far into this CBB project (at version 0.50a I believe) I switched my thinking and decided to take advantage of perl's dbm support. This has one primary advantage. Any changes made to the data file are immediately saved. This also has some disadvantages. It tends to close off the data file so it can only be manipulated from within CBB. This is good from a ``data encapsulation'' perspective, but it suddenly becomes a problem if the data file needs to be manipulated in a way which CBB doesn't support. Another point to note is that because perl is so good at slurping in text files, and because of certain constraints imposed by the Tk front end, using the dbm format did not provide any speed advantage. In fact, for certain operations I noted a speed decrease.
With the above observations in mind, I decided to come full circle and return to saving CBB data files in an open ASCII format by default. The astute among you may observe that ASCII files have one major disadvantage. They are only saved at the user's request. So, one hapless user working all day without saving + one unexpected power outage, one press of the reset button, or one of any other creative ways people invent to destroy their data = trouble. To counter this problem, I created an auto save feature. At regular intervals, if the current data file has been modified, it is saved to a temporary file. This greatly reduces the risk of data loss stupidity or acts of God--or acts of God in response to our stupidity.
The ASCII data file format is defined to be one record per line with the fields delimited by the <tab> character. CBB saves the following fields in this order: date, check number, description, debit amount, credit amount, category, comment, and the cleared flag. Please feel free (in fact, I encourage you) to view a CBB data file with any text viewer (more or less.) The format is mostly self explanitory.
REMEMBER to always backup up your data before doing anything radical to it.
The easiest and simplest way convert your data files is to export them to the ``CBB'' format using your pre-0.60 version of CBB. This is a slightly different format than current versions of CBB use, but current versions of CBB will be able to detect this slightly different format and load the files correctly. When you save the file from the new version of CBB is will be save in the new format.
This section describes a perl script which automates the conversion of data file formats. However it is rumored to only work with perl4 and not perl5. All other parts of CBB require perl5.002 or greater. Please be careful with this script and always back up your data before you do anything radical. ``Your millage may vary.''
I have provided a perl script to automate the data file migration, migrate-to-0.60a.pl. It is located in the contrib subdirectory of the distribution-dir directory.
The migrate script will perform the following tasks:
When the script has finished, your data files should be all set for your new version of CBB. Start up CBB and poke around your files a bit. If you notice any problems, let me know immediately--and be glad you backed up all your data like I suggested earlier.
So, you want to go for a little test drive? Want to see how or if this thing works? Want to send me a 21 inch monitor? Just checking. :-) Well, read on ...
The following procedure will lead you through the process of creating a new account, importing some data, editing transactions, and balancing your account.
First, here is the ``one-paragraph'' version of this manual. To use CBB, first make a directory where you would like to keep your group of accounts. Then, go to this directory, run cbb, and make your account(s). Optionally you could choose to import the default categories, but this can be done at any time. Next, load the desired account (if it is not already loaded) and create, delete, and edit transactions to your hearts content. When your statement arrives in the mail, balance your account. Meanwhile, you have been printing some reports, viewing some graphs, maybe setting up some recurring transactions, and hopefully managing your money better than before you started using CBB!
Ok, so you've just installed CBB. What now? Well, if you are like me, you will have already run it a few times before you cracked open the manual and read all the way down to here. So go ahead and lauch CBB again. The first thing you need to do is create an account.
Now that you have created an account it is time to enter a few transactions. If you like, you can import some sample data to save your fingers from the brutalities of typing. Otherwise, feel free to skip this section and enter your own transactions. The CBB distribution comes with some sample data just for this tutorial.
Now, that you have some data to play with, try editing a transaction. Click the ``!'' box or hit enter to commit the transaction. Click the ``X'' box or type <Meta-N> to clear the entry boxes and start over.
Now try creating new transactions.
Try playing around with ``splits'' to specify more than one category for a transaction. Feel free to explore the menus and buttons until you get the hang of things. You can refer to Section 4.2 for a more detailed description of transaction editing.
Now, lets pretend you just received your bank statement in the mail and you want to reconcile your new account. Lets also pretend that you didn't mess thing up too bad back in Section 3.4.
When your next statement arrives and you run the balance routine again, you will only be presented with ``uncleared'' transactions to select. This is a good way to spot old checks that never were cashed ...such as your mortgage payment that got ``lost in the mail.'' Note: by balancing your checkbook in this manner, two good things happen. The first is, when your brother finally cashes that check for $100.00 - many months after you wrote it - your bank balance doesn't suddenly drop -$100.00 from where you think it should be. That transaction had always been entered and subtracted out of your bank balance. The second good thing is that it is easy to spot these sorts of situations so that you can call up your brother and pester him to cash the check.
Now that you have entered a bit of data, you may want to ``understand'' your data at a deeper level. CBB comes with several reports and graphs which can help you get a better idea of where and how your money is being spent. Feel free to look at a few reports and graphs at this point.
Wow! You've been slaving away for the last 10 minutes perfecting your demo account. Great job! That is about all there is to it. CBB isn't rocket science. It just boils down ``plus and minus''. Since this is not real data, you probably don't care to save it. However, if this had been an actual account, you most definitely would want to save your hard work. CBB stores all your changes in memory, so you must save the account before you quit. If your forget to save your work before you quit, CBB will remind you to do this. If you do something awful, like reboot your machine or log out without saving, you are not completely out of luck. CBB periodically saves a backup copy of your account with a file name of #account.cbb#. When you reload your account, CBB will notice the autosave file and ask if you want to load it instead. Under normal circumstances you will want to answer yes. If you aren't sure, don't do anything. Exit CBB, go to your data directory and look at the files manually to make sure which version is the one you want.
To create a new account from scratch, choose Make New Account ... from the File menu. Enter the account name without any extension. (CBB will automatically add a .cbb to the name you provide.) This account name will become a category of the form [acct-name] description for use in transfers between accounts. Section 4.4 explains how transfers work. Next enter a description for this account. When you satisfied with your name and description, click on the Create Account button and your new empty account will be created and loaded.
To create a new account based on exported Quicken data, create a new account from scratch as described in the previous subsection. Once the account has been created, Quicken data can be imported into it. Importing data from Quicken is explained in Section 4.10.1.
Setting an initial balance for an account is as simple as creating a first transaction with a credit amount equal to the initial balance.
At all times in CBB (except for those times when you are doing other things) you are either creating new transactions, or editing existing transactions. Other operations such as balancing may temporarily suspend the entry, but when the chosen function is completed, you are returned to your current edit or insert operation.
At any time you can abort the current edit or insert operation by initiating a new edit or insert or by clicking the ``X'' button to the right of the entry area.
When you are satisfied with the current contents of the edit area, hit Return or click the ``!'' button to the right of the entry area and the transaction will be updated. If you are creating a new transaction, it will be inserted. If if you are editing an existing transaction, it will be updated.
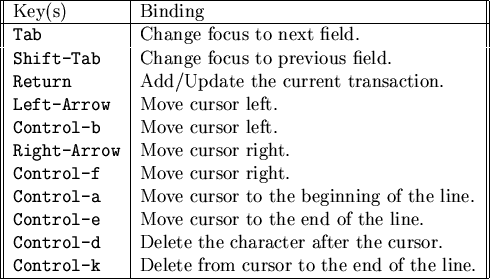
Tk4.x provides several standard key bindings to facilitate data entry. These tend to mimic emacs key bindings. Figure 1 shows a list of some of the more useful of these key bindings. For those hackers among us: look in $(TK_LIB_DIR)/entry.tcl for a complete list of key/mouse bindings.
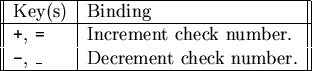
When the focus is in the check number field you can use the + and - keys to increment and decrement the number. CBB remembers the last check number you used, so when you are creating a new transaction, pressing + will insert the next check number. Figure 2 shows a list of these key bindings.
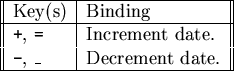
The + and - keys work as you expect when the focus is in the date field. They will increment or decrement the date. CBB tries to keep track of things like leap year or even the number of days in a specific month. So, if CBB generates an illegal date such as 2/30/97 please report this as a bug. Figure 3 shows a list of these key bindings.
The Splits function allows you to ``split'' the value of a transaction among several different categories. Caution: Even though you may click Dismiss in the Splits window, the transaction will not be updated. You need to hit Return or click the ``!'' button again once the splits window is closed. Note: If the splits window does not provide enough lines, you can increase the maximum number of splits in your .cbbrc.tcl file.
CBB keeps a list of transactions sorted and indexed by the description. When entering a typical transaction you would normally first specify the check number, then specify the date, then specify the description. If you have entered a similar transaction in the past, then you only need to type the first few characters of the description, hit Tab and the rest of the transaction is filled in for you. At this point you should make any necessary changes. Finally, you can update the transaction by hitting Return.
If you don't want your transaction completed (i.e. your transaction is being completed in an undesired fashion) you can type Control-Tab in the description field to avoid the completion feature.
The transaction is auto-completed only once per transaction. In other words, your changes won't keep getting overwritten each time you tab through the description field. Also, this feature is only activated by Tabbing from the description field. Shift-Tabbing or pressing Return have the same effect as they do in any other field.
Note: You can turn this feature on and off from the File -> Preferences menu.
Categories are used to give each transaction a ``type.'' This is useful for reporting, since the report can be organized by category.
Categories can be viewed by typeing <Meta-C> or selecting Categories -> Category List ... from the Functions menu. This brings up a list of categories. When the category list is open, double clicking on an category will paste it into the current entry. Alternatively, you can select a category and click on the Paste button.
Adding a category is as easy as using it in a transaction. When the transaction is updated, and the category is unknown, you will be asked if you wish to add the new category. Simply fill in the category description and check the Tax Related box (if it is tax related.) Once you are satisfied, click on the Add button.
Alternatively, you can bring up the category list and click on the Add button.
As a last resort, you can manually edit the categories file. CBB stores the category file in the same subdirectory as the associated account file. Note, the fields are delimited by tabs. Have fun and be careful if you try this!
Once the category list window has been opened (see Section 4.3.1) simply select a category and click on the Delete button and the category will be deleted.
When an account is created, a category of the form [acct-name] is also created. To create a transfer to another account, use the destination account name (enclosed in [ and ]) to specify the account being transfered to. When the transaction is inserted into the current account a corresponding transaction will be inserted in destination account.
WARNING: currently when a transfer transaction is edited or deleted, its corresponding transaction in the other account should be automatically changed as well. This code is not well tested at this time, so keep your eyes open if you edit transfer transactions and make sure the corresponding changes get made on the other end. CBB will warn you whenever you edit or delete a transfer transaction.
Clicking on the Balance button will bring up a list of all ``uncleared'' transactions in a window. CBB already knows your statement beginning balance. It is simply the sum of all the cleared transactions. Verify your statement's beginning balance then enter your ending balance. Then go through all your ``uncleared'' transactions and check off all that are listed on your statement. CBB will keep a running total of the beginning balance + the transactions. When you are all done, this should equal the ending balance. If it doesn't, there is a discrepancy someplace ...which will hopefully be not too hard to track down. When everything matches, click on the Update button. This will ``clear'' all the selected transactions. When you balance your checkbook next month, only the ``uncleared'' transactions will be presented to you.
This technique makes it easy to spot and handle situations when some ``individual'' doesn't cash your check for 3 months ...it is still in the system and easy to spot. This way your idea of your balance stays in sync with the bank's idea of your balance. And since it is entered into CBB and subtracted from your running balance, you won't get burned when they finally do cash it.
If you notice a discrepancy that needs to be fixed while balancing, you can bring the main CBB window forward and make your changes. Then, bring the balance window forward and click the Refresh button. This will bring the balance window back in sync with the main window. Alternatively you could close and reopen the balance window.
As of version 0.60 of CBB, I have completely reworked the reporting mechanism. Each report is actually a stand-alone, self-sufficient, executable perl script (although there is nothing magical about the use of perl, they could be written in any language.)
When you select a Reports ... you are presented with a dialog box. In this dialog box you can select the report you would like to print, the files you would like to include in the report, a date range, and report destination. If you wish to include all transactions up to a certain date, leave the Starting Date field blank. If you wish to include all transactions from a certain date on, leave the Ending Date field blank. To include all transactions leave both fields blank. Dates should be in the following format: mm/dd/[[yy]yy]. Valid dates are 5/19, 5/19/95, and 5/19/2095.
Reports can be printed to a variety of destinations. If you select Send to Screen the report will be displayed in a window. If you select Save to File or Pipe, enter a file name in the appropriate field and the report will saved to that file. If you specify a file name of the form | command, CBB will pipe the output of the report through the specified command. For instance, if you wanted to send the report to a printer, you could enter something like:
| nenscript -2Gr | lpr -d hp4L
The first report is simply a list of all transactions. It looks remarkably like the contents of the transaction list box.
The next report displays all transactions sorted and subtotaled by category. It properly handles splits.
This report is similar to the Transaction List By Category report except it omits the individual transactions and only displays the sum of the transactions for each category. It also properly handles splits.
When you balance your account you mark all the transactions that are listed on your bank statement as ``cleared.'' The uncleared transactions are those that the bank has not yet reported on any statement. This report lists all the uncleared transactions. This list of transactions should be identical to the list that is displayed when you select the Balance function.
This report will scan through all the transactions of the selected accounts and find any breaks in the check number sequence. It will also flag any duplicate check numbers.
This report is a nice tool to assist in budgeting. It will show your average monthly expenses for each category.
Graphing is very similar to reporting. Each graph is actually a stand-alone, self-sufficient, executable perl script which process the input data and calls a second Tk script to display the result.
When you select a graph you are presented with a dialog box similar to the one presented for report printing. You can select a graph, group of input files, and a date range. If you wish to include all transactions up to a certain date, leave the Starting Date field blank. If you wish to include all transactions from a certain date on, leave the Ending Date field blank. To include all transactions leave both fields blank. Dates should be in the following format: mm/dd/[[yy]yy]. Valid dates are 5/19, 5/19/95, and 5/19/2095.
This graph is analogous to the ``Transaction List'' report. It simply plots a graph of your running balance over the specified date range.
Currently, preferences need much work ...However, you can set a few things including fonts in your .cbbrc.tcl file.
If you have your own custom Tcl code you would like to include (such as setting your favorite key bindings) you can created a file called .wishrc in your home directory and place the code there. CBB will source this file if it exists after it sources your .cbbrc.tcl file.
All changes must be saved--or how could they be called changes.
CBB is similar to vi or emacs in that all your changes are made in RAM. So, just like you must save your work in vi or emacs, you must save your work in CBB. To do this, click on the Save button or select Save Account or Save Account As ... from the File menu.
CBB has an ``auto save'' feature. Your proposed changes are saved to a temporary file at regular intervals. (This interval defaults to 3 minutes and can be set in your .cbbrc.tcl file.) If CBB is killed or crashes, the autosave file will be left intact. When you startup CBB and load the account, CBB will notice the autosave file and ask you if you would like to use it instead.
And, as my great grandfather always said, ``save early and save often!''
CBB is capable of importing Quicken export files. These files are of the form <name>.qif. The transfer process is relatively simple.
CBB is also capable of generating Quicken export files. These files can be imported into Quicken. This process is also relatively simple.
Computer security is a lot like other types of security. There is no such thing as a perfect secure computer system or network. For every protection you put in place, some clever person will be able to devise a way to circumvent it. Usually when a cracker is discovered, whatever hole they leveraged to gain their illegal access can be closed. The cracker then proceeds to find a new hole. It is a never ending cycle.
Having said that, there are steps you can take to protect your personal privacy and make sure that any violation is intentional and nonaccidental.
If you are the only user of a non-networked machine, this section will probably not be your biggest concern, however, if you use CBB on a shared machine, please read on. You may wish to protect your personal financial data from being potentially viewed by others.
Starting with version 0.73, CBB sets it's umask to 0066. For those of you who aren't brushed up on bitmasks and octal numbers, this means that your data files are made to be read/write by only you. This is equivalent to executing chmod 600 file.cbb from the Unix command line. This means that only you or the ``super-user'' are allowed to read or modify your data.
Making your data non-readable to everyone but yourself is usually sufficient in most normal circumstances. However, the most vigilant (or paranoid) users might like the additional security of keeping their data encrypted. CBB is now capable of calling an external encryption program such as ``crypt'' or ``pgp'' to encrypt and decrypt your data as needed.
WARNING: The first rule of encryption says that using cryptography programs without a proper level of understanding of what is going on is usually worse than not using any encryption at all!!!
There are many pitfalls here, so proceed only if understand what encryption can and cannot do for you, and only if you know what you are doing (in general), and make sure to keep good backups of your data (in a secure location, otherwise what good is encryption.)
In order to use the encryption features, you have to check the button Use Cryptography in the Preferences menu.
If there are no cryptography programs already defined, you will then be asked to enter your encryption and decryption program and options.
Basically you can use any program that follows the following criteria:
PGP fulfills these requirements if you use the following options:
If you specify the encryption code of ``secret,'' CBB will then invoke pgp with pgp -fc -z secret to encrypt and pgp -f -z secret to decrypt the data.
Note that this does not use public key cryptography, but simply uses the IDEA algorithm to encrypt the data.
This way of passing the code is also a possible security leak on some systems, because other users might be able to snoop the command line arguments to pgp (Linux allows pgp to blank out this particular argument, so you cannot see it with ps -e).
There might be other security risks in this way of handling encryption, so please check the pgp manual.
After having entered the encryption and decryption progam, you will be asked for the ``cryptcode'' (the key). You have to enter it twice (you don't want to lose data because you encrypted it with a mistyped key), and instead of letters, there should appear only "*" in the entry box.
If you now save an account, it will be encrypted. Also the preferences will be saved (they get saved each time you save an account - and only then, so save an account after changing them.) This does save the ``encrypted mode'' flag, and the encryption and decryption commands. It does not save the cryptcode (you don't want to read it in your preferences file, do you).
When ``encrypted mode'' is entered, logging is turned off (no sense in having encrypted data files, if your transaction log is unencrypted). It is turned back on, if you leave ``encrypted mode.''
If you are in ``non-encrypted mode,'' you will notice that your encrypted accounts don't show any balances in the account-list anymore.
If cbb gets started in ``encrypted mode'' it will ask you automatically for your ``cryptcode'' before starting.
This section is contributed by Michel Verdier (mverdier@chez.com). It describes some techniques you can use to share cbb accounts between multiple users. Please be aware that some of the details in this section are Linux specific.
Also a word of WARNING: CBB works like an editor in that it reads a copy of your account into memory. Your changes happen in RAM. Only when you save the file are your changes written out to the disk. CBB does not handle true concurrent usage! If two people are working on the same account at the same, one person's changes will get overwritten by the other persons changes.
But, with all due disclaimers, here is a description of something you
can do when you mix a little Unix and a little CBB.
Michel Verdier writes:
Your girlfriend wants to use CBB too! And of course you are sharing some accounts. You can't just take some accounts and give her some others. You wouldn't either take all accounts and give her your password ...
Ok. Here is a solution using a common user and "super" to launch CBB.
First create a user and give it your accounts.
addgroup cbb; adduser cbb
mkdir /var/cbb; chmod 700 /var/cbb
chown -R cbb:cbb /var/cbb; chmod 600 /var/cbb/*
Good! Now nobody except cbb would crash your accounts. :-) Let's configure super. Hum, do you install it?
Add a line in /etc/super.tab:
cbb /usr/X11R6/bin/cbb uid=cbb gid=cbb info="Launch cbb" @your_host_nameThis will grant access to CBB from everyone from your machine. If you want just you and your girlfriend, use:
  cbb /usr/X11R6/bin/cbb uid=cbb gid=cbb info="Launch cbb" \
    you@your_host_name \
    her@your_host_name
And finally you both can type :
super cbb -display :0
super will launch CBB with user cbb and group cbb. CBB will start in /var/cbb and will find your accounts. Don't forget the display. Or perhaps put in /etc/profile :
export DISPLAY=:0
If you still get a message like :
  Xlib: connection to ":0.0" refused by server
  Xlib: Client is not authorized to connect to Server
add somewhere after X starting (could be your window manager login) :
  xhost +localhost
  xhost +your_host_name
This section describes several scripts that are beyond the original scope of CBB, yet may be useful in managing your money. These scripts are installed in: $CBB_LIB_DIR/contrib
The script fetch-latest.pl will automatically fetch the latest version of CBB from ftp.me.umn.edu. It will then untar and gunzip it. Finally it will run the standard install procedure to install it.
You can run this script from within CBB by selecting Fetch & Install Latest CBB from the External menu. Then, answer the standard install questions when prompted. Don't forget to quit and restart CBB once the install has completed successfully.
The script invest.pl is a simple hack to help keep track of your investments. An alternative would be to use a real application like ``Xinvest''. A pointer to Xinvest can be found on the CBB web page.
The invest.pl accepts a simply formatted text file from stdin and writes a simple report to stdout. A sample input file could look like the following. Note: each field is separated by one or more tabs.
# Date          Description             Shares  Unit Price
#-----          -----------             ------  ----------
19960101        Beginning of 1996       10.000  25.00
19960201        Updated value           0.000   26.56
19960301        Purchase more shares    10.00   25.87
19960401        Updated value           0.000   26.04
19961216        St Cap Gain Reinvest    1.157   26.43
19961216        Lt Cap Gain Reinvest    1.220   26.43
19961216        Service Fee             -0.568  26.43
Executing the command: cat sample.inv | invest.pl would produce the following output:
                                        Price   Total
                                New     per     Shares  Total   Total
Date     Description            Shares  Share   Owned   Invstd  Value
-------- ---------------------- ------  ------  ------  ------  ------
19960101 Beginning of 1996      10.000  25.00   10.000  250.00  250.00
19960201 Updated value          0.000   26.56   10.000  250.00  265.60
19960301 Purchase more shares   10.000  25.87   20.000  508.70  517.40
19960401 Updated value          0.000   26.04   20.000  508.70  520.80
19961216 St Cap Gain Reinvest   1.157   26.43   21.157  539.28  559.18
19961216 Lt Cap Gain Reinvest   1.220   26.43   22.377  571.52  591.42
19961216 Service Fee            -0.568  26.43   21.809  556.51  576.41
Please see section 2.7, page ![]() for
an explanation of this script and its use.
for
an explanation of this script and its use.
Wouldn't you like your mortgage payment to entered automatically every month? Would you like to have some idea of how much money you will have in a month, six months, or a year? Then read on. This might be just what you need.
Recurring transactions which have been automatically inserted are denoted by placing a ``?'' in the ``cleared'' field. This is changed to a ``!'' when the transaction date has passed. (Note: this code is changed to a ``x'' when the transaction is cleared.)
The recur.pl script has two main sections.
The config (<account>.rcr) file is reminiscent of a crontab file. The format is slightly different, but the idea is generally the same. Specify the days, months, and years that the transaction will take place, then specify the transaction. One thing to note is that all fields must be separated by one <Tab> character. The script will then insert that transaction on those days.
For instance, the following entry will cause an auto loan payment to be inserted on the fifth of every month. Once the transaction has been entered, you can make any changes you like to it, such as adding
# Days  Months  Years   Description     Debit   Credit  Comment Category
# ----  ------  -----   -----------     -----   ------  ------- --------
5       *       *       Loan's R Us     100.00  0.00            Auto-Loan
Another variation would be the following entry which will insert a transaction every fourth of July.
4 7 * Fireworks 35.00 0.00 Bang Entertainment
The next entry will insert a transaction on the 15th and last day of every month.
15,last * * Salary 0.00 3.14 Peanuts Salary Income
This entry will insert a transaction on the 1st day of January, April, July, and October.
* 1,4,7,10 * Auto Insurance 200.00 0.00 Approx. Insurance
REMEMBER, separate each field by a <Tab> character and
not spaces.
Finally, a slightly different entry format will allow you to enter transactions based on a regular interval such as every other week. The first field specifies the start date of the interval. This can be any date, but recur.pl will never enter past recurring transactions. The transactions will kick in after the current date. Then next field is the interval in days. So 14 would specify an interval of every other week. The third field is ignored and not used. The last five fields are identical to the previous types of entries.
# Start Date  Intrvl Not Used  Description  Debit  Credit  Comment  Category
# ----------  ------ --------  -----------  -----  ------  -------  --------
19960119      14     *         Salary       0.00   2.78    Peanuts  Salary
You can make your recurring transaction happen automatically by running recur.pl out of cron. The details of setting up a cron job may vary between Unix systems. Please refer to your local cron and crontab unix man pages.
WARNING: Be aware that if this cronjob runs while you are actively editing a CBB account, you will likely loose the results of the recur.pl job as soon as you save your current CBB session.
#!/bin/sh

# CBB recurrent transactions
# find all users files and apply recur.pl for each

CBB_PATH="/usr/X11R6/lib/X11/cbb"
CBB_DATA="/var/cbb"

if [ -x "$CBB_PATH/contrib/recur.pl" ]; then
    for dir in $CBB_DATA; do
        for fic in `find $dir -name "*.rcr" -print| sed s/\.rcr$//`; do
                        user=`ls -l $fic.cbb | awk '{print $3}'`
            su -l $user -c "$CBB_PATH/contrib/recur.pl $fic.cbb > /dev/null"
        done
    done
fi
The script yearend.pl simply moves all uncleared transactions from the specified account to a new account. This helps keep file sizes smaller. Usage: yearend.pl <account>.cbb <new-account>.cbb
A number of people have enquired about text interfaces to CBB. Currently there is no complete solution, but there are a few options. Note, rumor has it that someone is working on a dialog interface to CBB, I look forward to seeing this when it is ready.
Christopher B. Browne (cbbrowne@hex.net) has provided a perl script called txn. It will append records to .cbb files, and do so from the command line. For instance:
[25%] txn checking -t '75' 'The Mansion in Dallas' Lunch 75.00 'Gratuitously expensive luncheon'
Added to /home/cbbrowne/kwiken/checking.cbb
19970422 75 The Mansion in Dallas 75.00 0 Lunch Gratuitously
expensive luncheon
This script does have certain limitations:
Ravinder Bhumbla (rbhumbla@atol.ucsd.edu) has contributed an Emacs forms-mode for browsing/editing .cbb files from within Emacs. Emacs version 19 has a forms mode which can be used to browse regularly ordered data. It is a convenient tool when you are not at an X terminal.
Just read the file .../contrib/emacs-forms into an Emacs buffer. Edit the path to your .cbb file where it says ``EDIT HERE'' and then type M-x forms-mode. Emacs will ask if you want to evaluate the current buffer contents. Type ``yes''. (Ravi)
CBB stores it's data file in a simple tab-delimited format. If you are careful about maintaining the correct tab-delimited format, it is quite possible to edit your files with just about any text editor. You will definitely want to make a backup copy of your .cbb file before attempting this. It is very easy to make a mistake and corrupt a transaction record. However, this can be a useful technique for many tasks.
For instance, lets say my wife just informed me that comestibles are spelled ``Food'' not ``Fude''. I could use a text editor to do a global substition through my entire .cbb file to fix this mistake. Another use could be for deleting or duplicating blocks of transactions.
This simple format gives you last-resort options when you need to do something that the graphical interface was not designed to do.
Most spreadsheets and database applications can load tab-delimited files. This is another alternative for manipulating or viewing .cbb files in ways that the graphical front end cannot.
CBB stores the values of a few standard variables in the .cbbrc.tcl file. Whenever CBB starts, it first sources this file. This file is regenerated based on the current value of the relevant variables whenever an account is created, loaded, or saved. Any additions/deletions will be lost. However, changes to the values of the variables will be maintained. Some of the preferences that can be set in your .cbbrc.tcl file are: debugging on or off, balloon help on or off, USA or international date format, autosave interval, main list box dimensions, account list box height, maximum number of splits, font selection, color selection, and your favorite web browser. Please look in your .cbbrc.tcl for a complete and current list of preferences that can be set.
CBB has a user configurable menu entitled External. The file extern.conf controls the contents of this menu. An example of an extern.conf file is:
    Calculator <Tab> xcalc
    Calendar   <Tab> ical

    -

    Install the Latest CBB   <Tab> xterm -sb -e \
        \$lib_path/contrib/fetch-latest.pl
The first field (everything before the <tab>) is the name to appear on the External menu. The second field (everything after the <tab> is the command line of the program to execute. Before launching the external program, CBB will save the current contents of the buffer to a temporary file. This allows the external program to have access to any changes that have been made, but not yet saved. The %t is replaced with the full path name of this temporary file. The %a is replaced with the full name of the current account file.
CBB has a ``simple'' well defined interface for installing new reports. Each report is a stand alone ``program'' which understands a predefined set of command line options and displays its output to stdout.
When the Configure Reports program is launched, it looks for the file, .../lib/cbb/reports/reports.conf. This file consists of entries like the following:
  Transaction List        rep-txn-list.pl
  Txn List by Category    rep-by-cat.pl
  Short List by Category  rep-by-cat-shrt.pl
Each line contains two fields. The report name which will appear in the dialog box, and the executable name of the report. CBB scans this file when it starts up in order to create the Reports menu.
CBB assumes that all report executables will also be located in the .../lib/cbb/reports/ directory. Each report must accept the following options where date if of the form mm/dd/[yy[yy]] and account-list is a list of a CBB (ASCII) format account files:
Usage: report [ -from date ] [ -to date] account-list
The report executable will read the entries in the specified account files, ignore any entries outside the specified date range, and print its output to stdout. The last thing the report should print is a single line containing the text none.
When a report is selected from the Reports menu, CBB displays the Report Configuration dialog box. When the user clicks on Generate Report, CBB saves the current contents of its ``buffer'' to a temporary file. It then looks up the corresponding report executable, and launches it with the above options. CBB reads the output of the executable (stopping when it receives a line containing only the text none) and routes it according what the user specified in the Report Configuration dialog box.
The procedure for creating and installing new graphs is analogous to the reports procedure. One thing to note, the graph executable should wait for a carriage return from stdin before exiting. This is CBB's way of letting the graph executable know that the user is done looking at the graph.
When CBB is invoked with the -devel option, a Devel menu is added to the menu bar. This menu will allow you to re-``source'' the various Tk pieces of CBB. With this option enabled you can reload various pieces of the code after modifying them without quiting and restarting CBB. This can greatly speed up the development process in some situtations.
This works by executing the Tk source command on the selected file. To use this feature effectively, you need to be aware of the contents of a particular Tk file. Effectively, you are re-running that code at the time you are sourcing it. Therefore, old procedure definitions will be replaced if they were changed. The thing to watch out for is code that is executed outside of procedure calls. This code will be executed when you re-source the file. This may or may not cause a problem if this code is intended to be run only once on startup.
Activating and using this menu is something you only need to be concerned about if you are actively developing code.
The FAQ tends to resist emacs TeX mode. This is most annoying.
Because of this I have placed the FAQ in its own separate file called
...Ta da!!! ...``FAQ''. The FAQ is also available on the CBB
web page at: http://www.menet.umn.edu/~clolson/cbb/
This document was generated using the LaTeX2HTML translator Version 98.2 beta6 (August 14th, 1998)
Copyright © 1993, 1994, 1995, 1996,
Nikos Drakos,
Computer Based Learning Unit, University of Leeds.
Copyright © 1997, 1998,
Ross Moore,
Mathematics Department, Macquarie University, Sydney.
The command line arguments were:
latex2html -split 0 -show_section_numbers cbb-man.tex
The translation was initiated by Curtis L. Olson on 1999-12-17